Let shoppers personalize your products with their own photos, AI art styles, background removal, and custom text - then get a print-ready file for every order. This guide walks you through setup, the shopper experience, plans, and day-to-day use.
1. What CPrint-ai does
CPrint-ai adds a personalization editor to the product pages you choose. Your shoppers make the product their own, see it live, and you receive a print-ready file with their order.
On a product you enable, a shopper can:
Upload their own photo and crop / position it on the product.
Restyle it with AI into one of eight art styles (oil painting, pop art, watercolor, and more).
Remove the photo background with one tap.
Add custom text in the fonts and colors you allow.
See it live - the customized design becomes the product image through cart and checkout.
When the order comes in, CPrint-ai renders a print-ready 300-DPI file for every side and attaches it to the order, so you (or your print partner) can fulfill it.
Who this is forAny store selling products that can be personalized - apparel, mugs, posters, canvas, tote bags, pet portraits, gifts, signage, and more.
2. Quick start (3 steps)
You can be live in a few minutes. Start on the Free plan - no commitment.
Install and open CPrint-ai
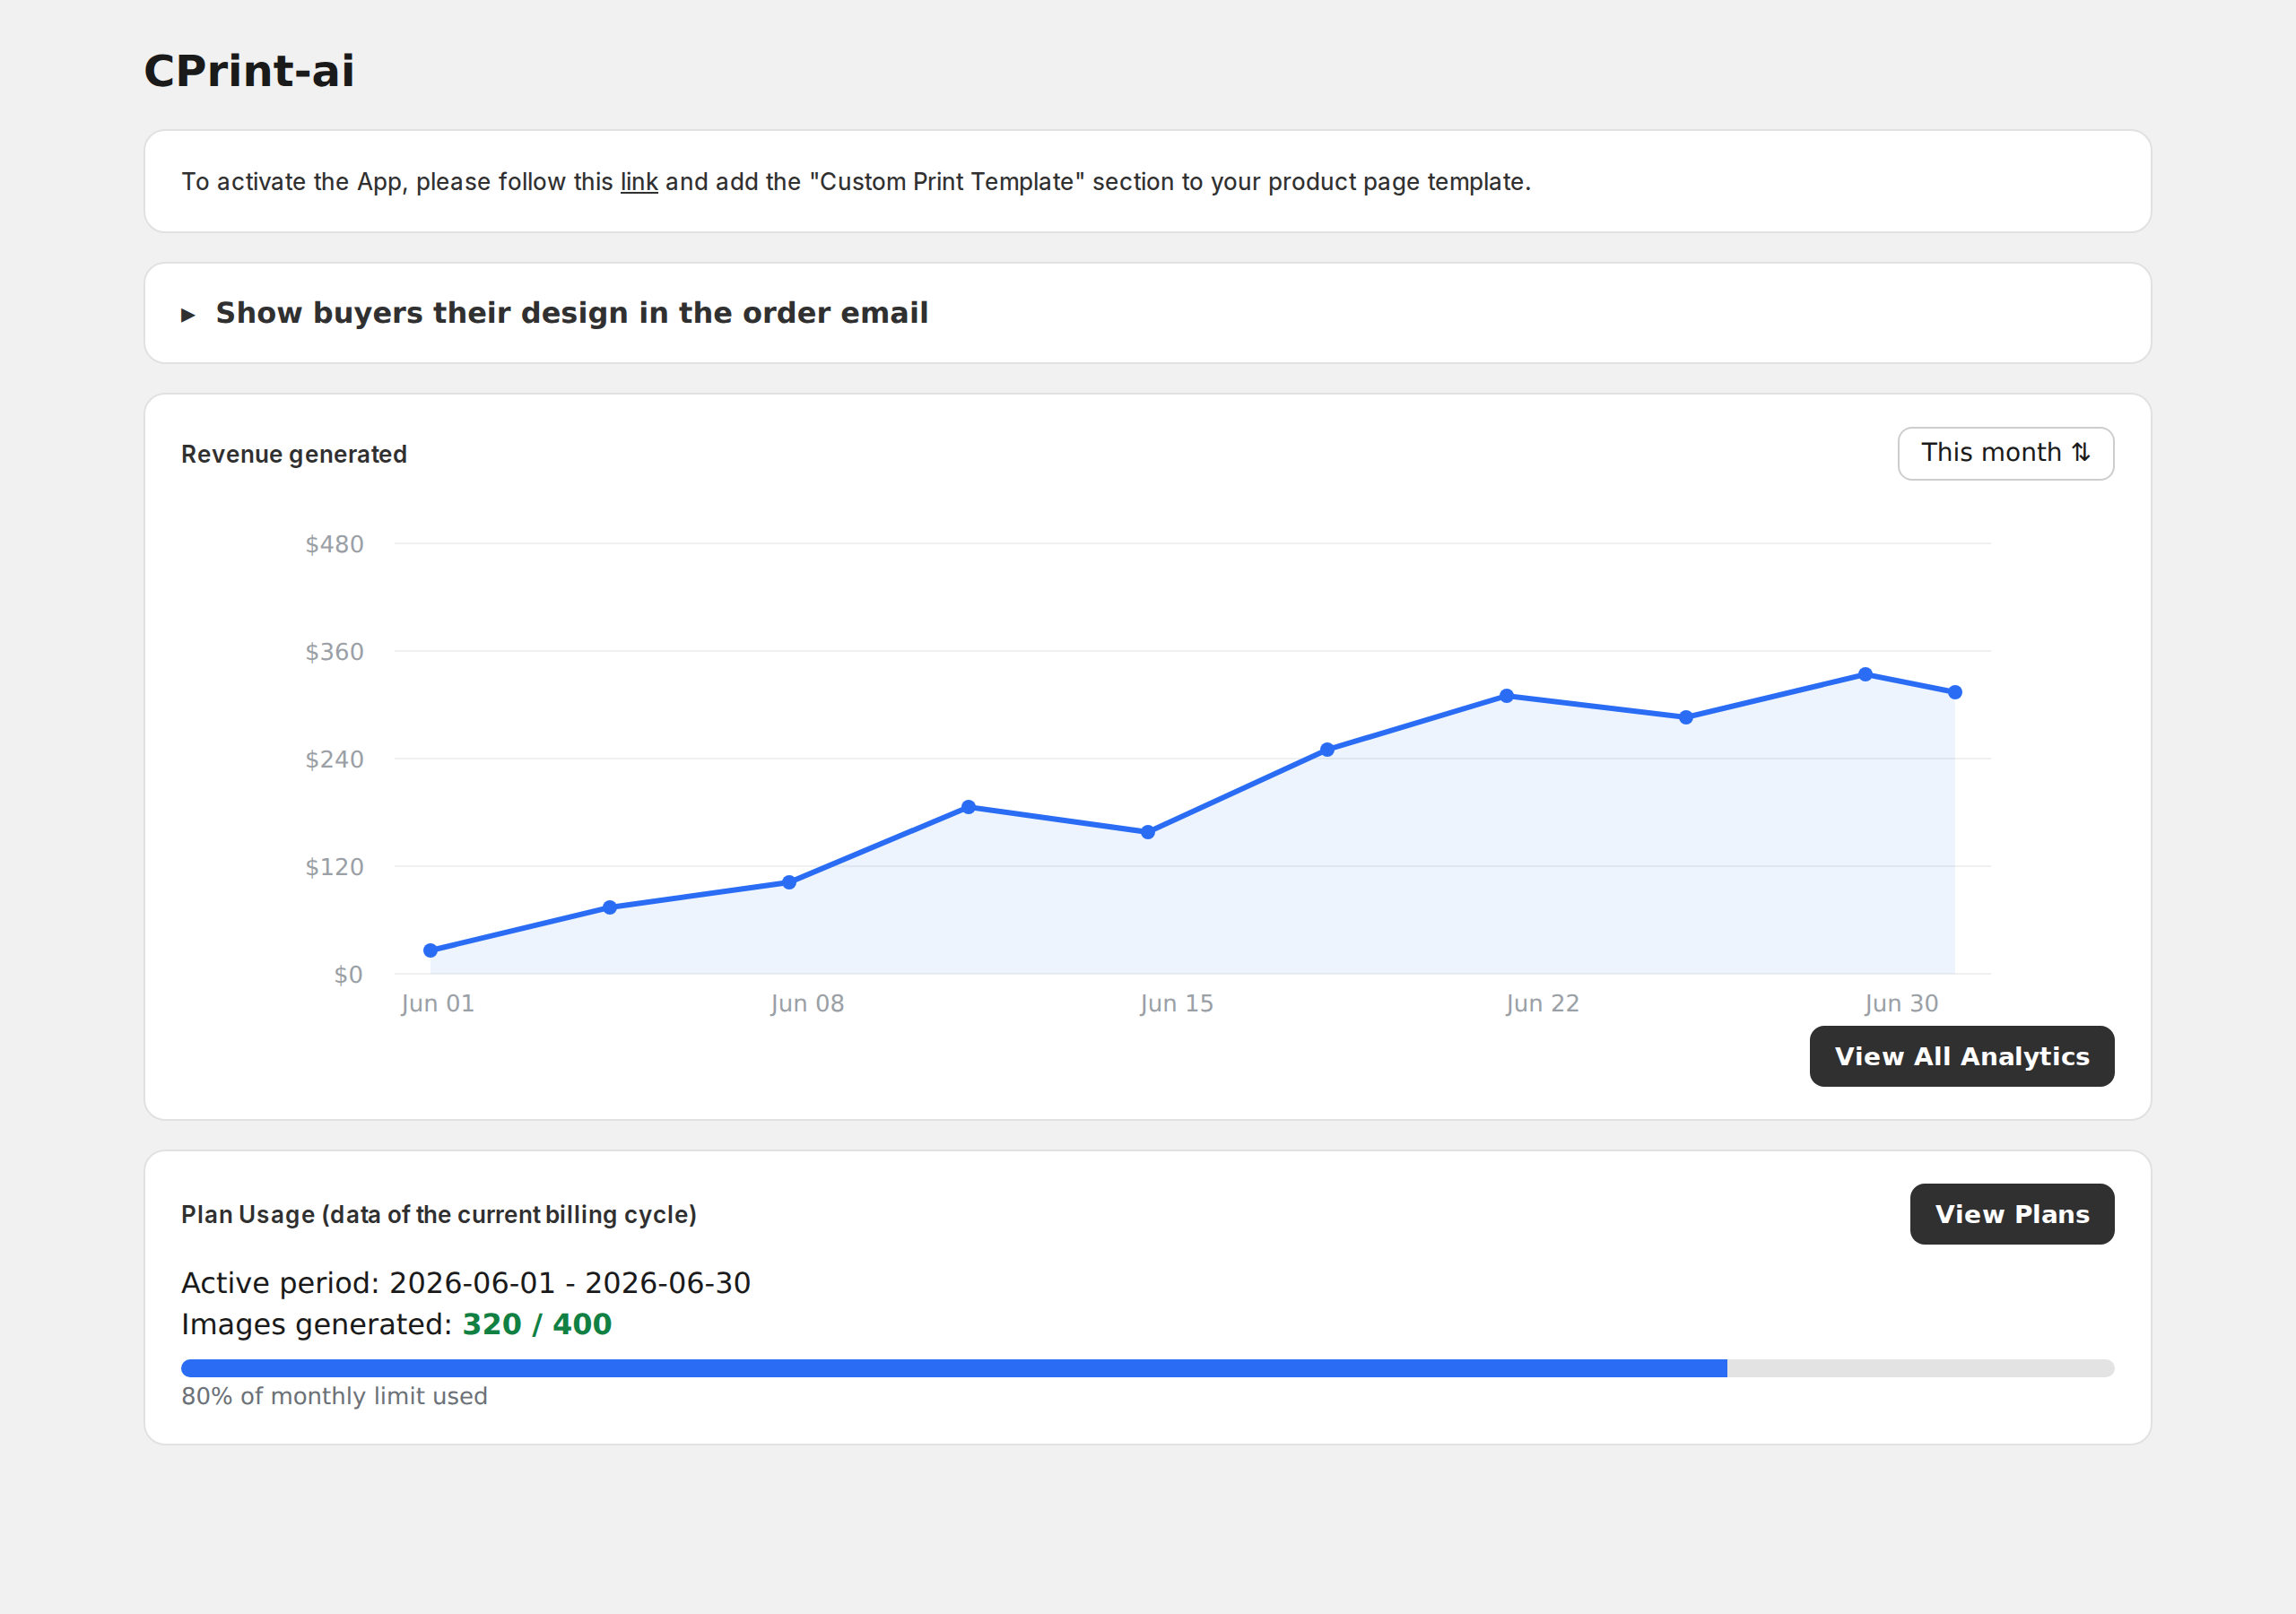
Add CPrint-ai from the Shopify App Store and open it from Apps in your Shopify admin. You land on the app Home (General) page.
Activate the editor on your product page
On the Home page, follow the activation link ("To activate the App, please follow this link..."). It opens your theme editor and adds the "Custom Print Template" app section to your product page. Position it where you want the customizer to appear, then Save the theme.
TipThe customizer only shows on a product once (a) the app section is added to the product template, and (b) you have created a template for that product (next step).
Create your first template
Go to Settings in the app and create a template for a product (full walkthrough in the next section). That tells CPrint-ai which product is customizable and how.
The app Home (General) page: the activation link, the order-email snippet, revenue generated, and your plan usage. Representative rendering using the app's Polaris components - your live data will differ.
3. Build a customizable product
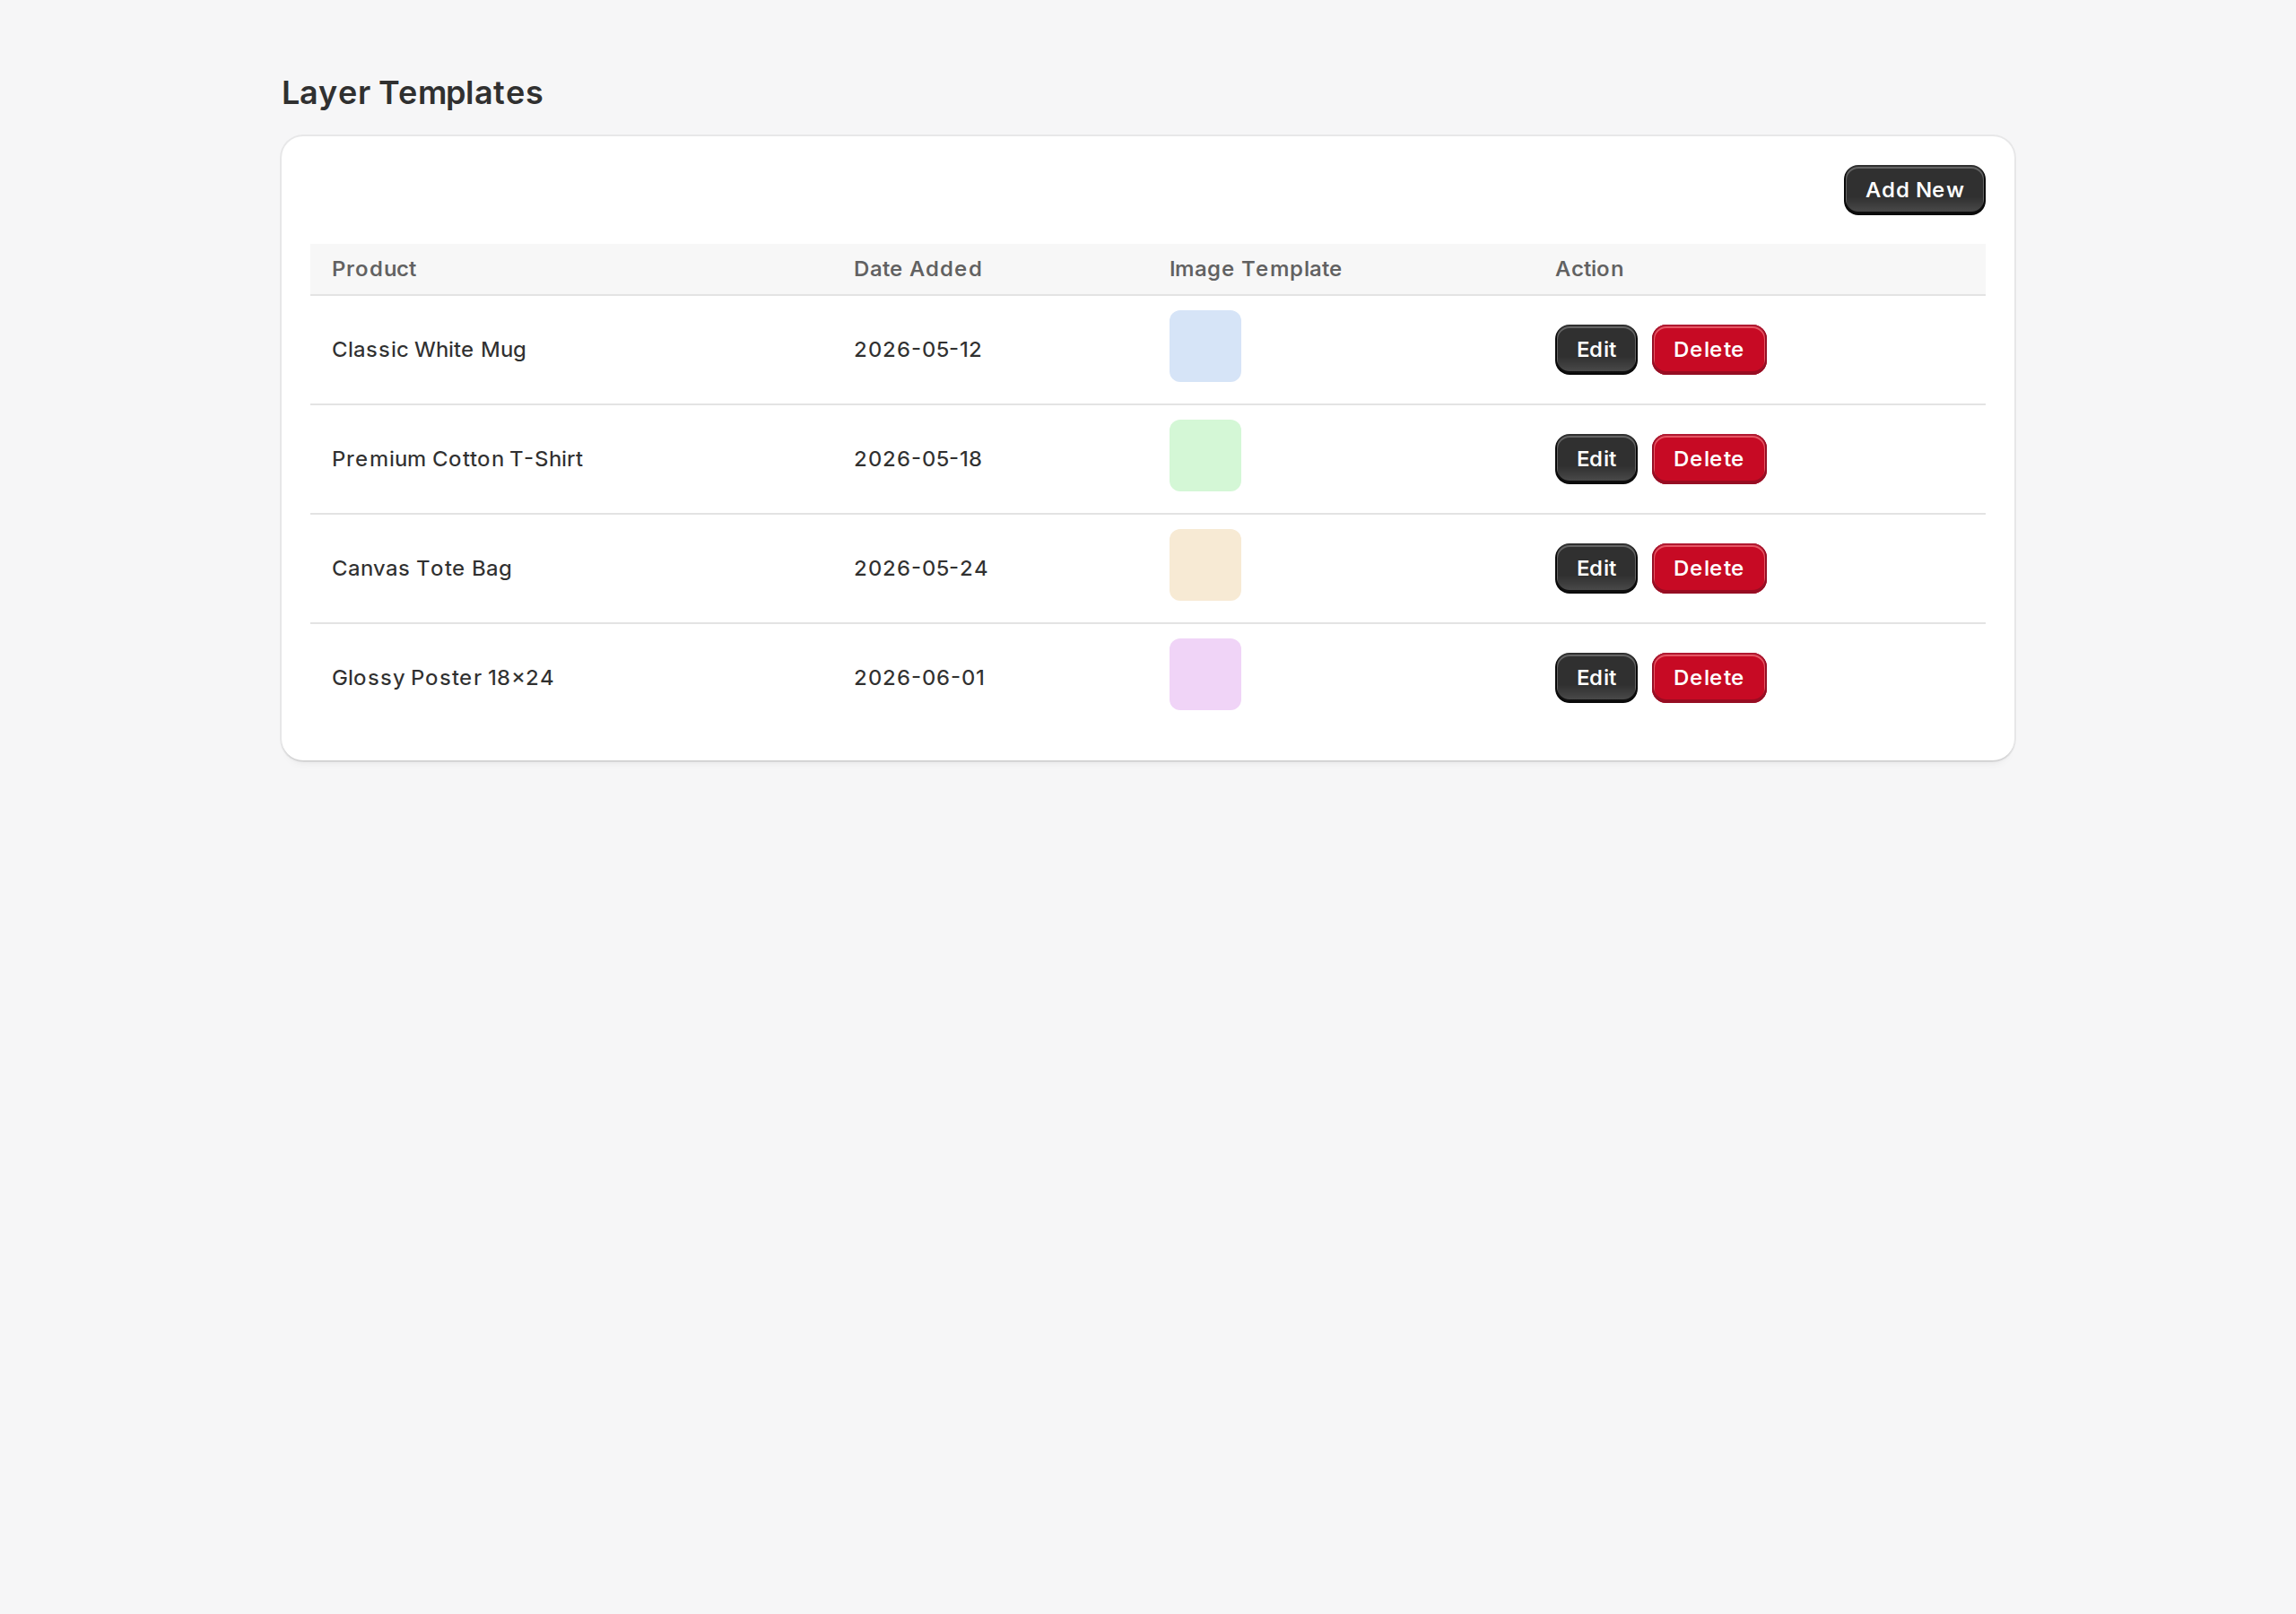
Open Settings to see your Layer Templates - the list of products you have made customizable. Click Add New to create one, or Edit an existing template.
Settings - your layer templates, one row per customizable product. Representative rendering; your products will differ.
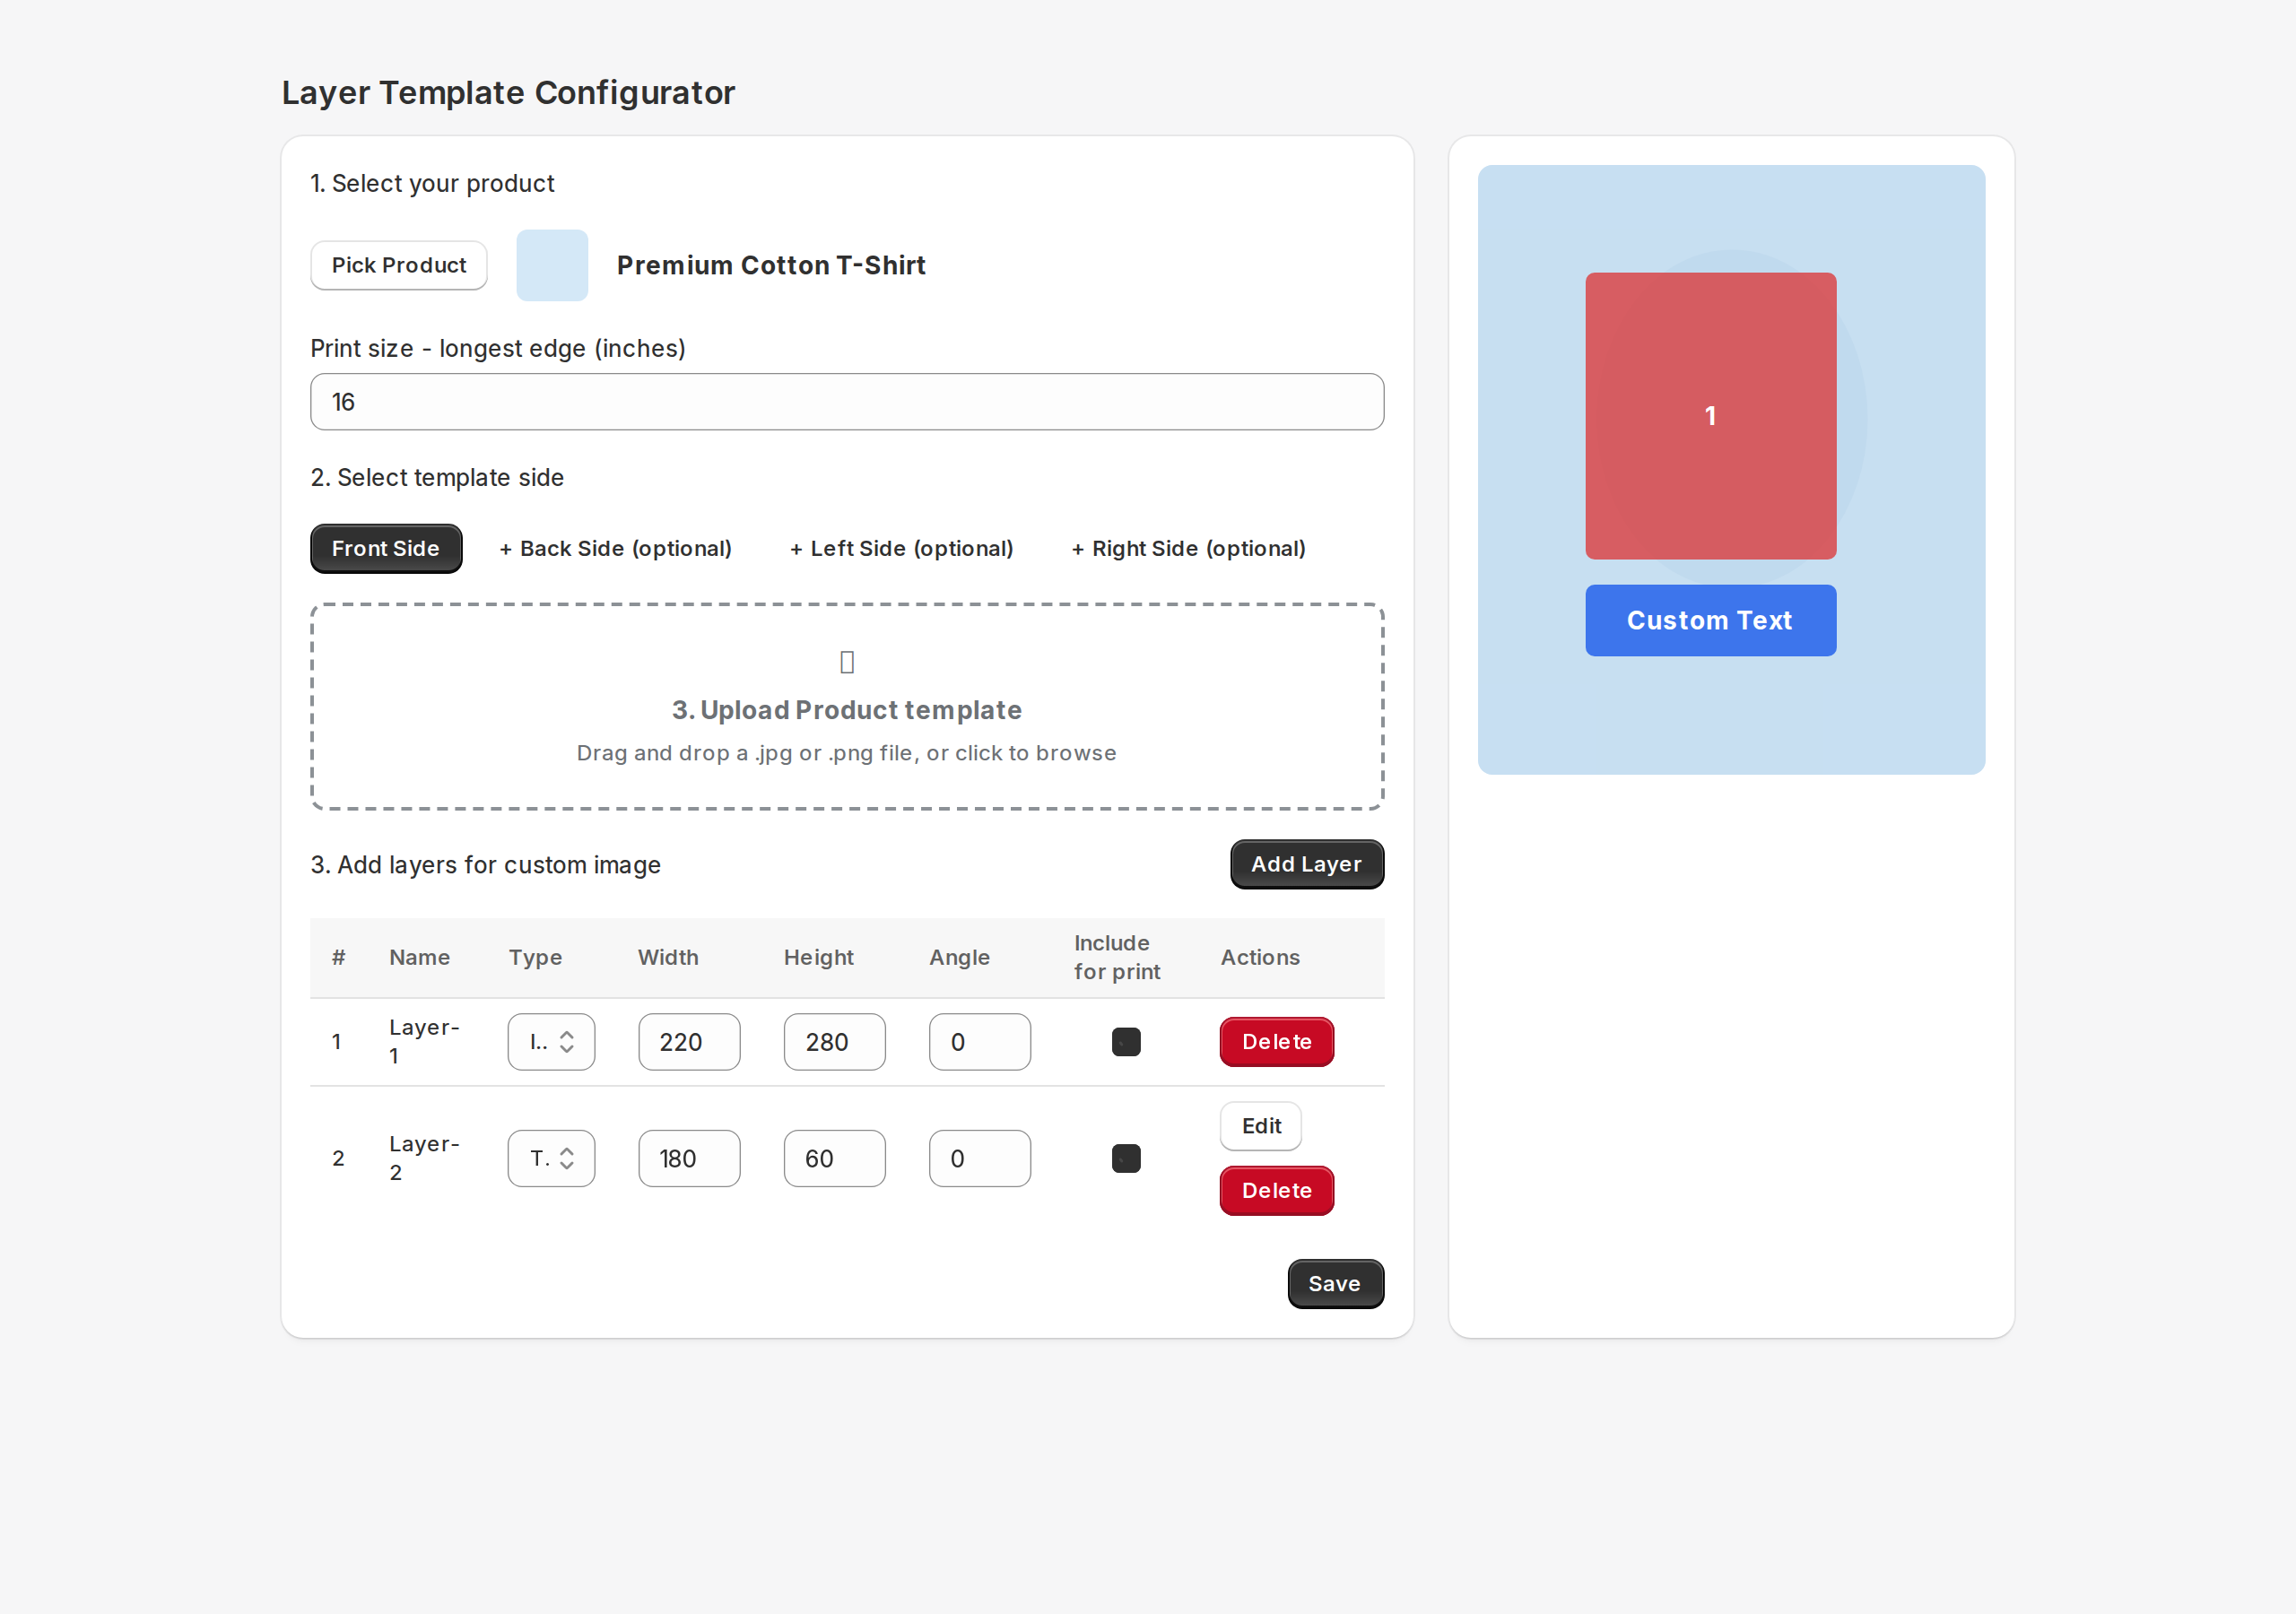
The Layer Template Configurator
A template has three parts: the product, one or more sides, and the layers (zones) buyers fill in. Work top to bottom:
Select your product
Click Pick Product and choose the Shopify product this template applies to.
Set the print size
Print size - longest edge (inches) sets how large the print-ready file is generated (default 16 in). Set this to your product's printable area so the output is the right resolution.
Choose a side and upload its template image
Front Side is required; Back, Left, and Right are optional for multi-side products. For each side, upload a product template image (.jpg or .png) - the mockup the buyer personalizes on.
Add layers
Click Add Layer for each zone the buyer fills in. Set Width, Height, and Angle, and drag the layer to position it on the live preview (right). Each layer has a Type:
Image - the buyer's uploaded (and optionally AI-styled) photo. Shown as a red zone in the preview.
Text - buyer-entered text. Shown as a blue zone. Click Edit to open Text layer settings.
Configure text layers (optional)
In Text layer settings you control: Label (the prompt the buyer sees), Max characters (default 20), Allowed fonts (tick the ones buyers may use - empty means all), a Default font, Allowed colors (add hex values), and a Default color.
Decide what prints
The Include for print checkbox (on by default) controls whether a layer goes into the print-ready file. Untick it for marketing-only layers that should appear on the mockup but not on the final print.
Save
Click Save. You stay on the page so you can keep editing. A template needs a product and at least one side that has an image and one layer.
The configurator: product, print size, side tabs, the layers table (with the Include-for-print column), and the live drag-and-drop preview on the right. Representative rendering of the admin UI.
TipStart simple: one product, one Front side, one Image layer. You can always add sides, text layers, and more products later.
4. The shopper experience
On an activated product, your shopper sees a single-screen editor. A typical flow:
Upload & personalize their photo into the image layer.
Crop and position it within the zone you defined.
Restyle with AI - pick one of your enabled art styles.
Remove the background if they want a clean cutout.
Add their text in the fonts and colors you allow.
Switch sides (front / back / ...) and personalize each.
Add to cart - the finished design becomes the product image and travels through checkout to the order.
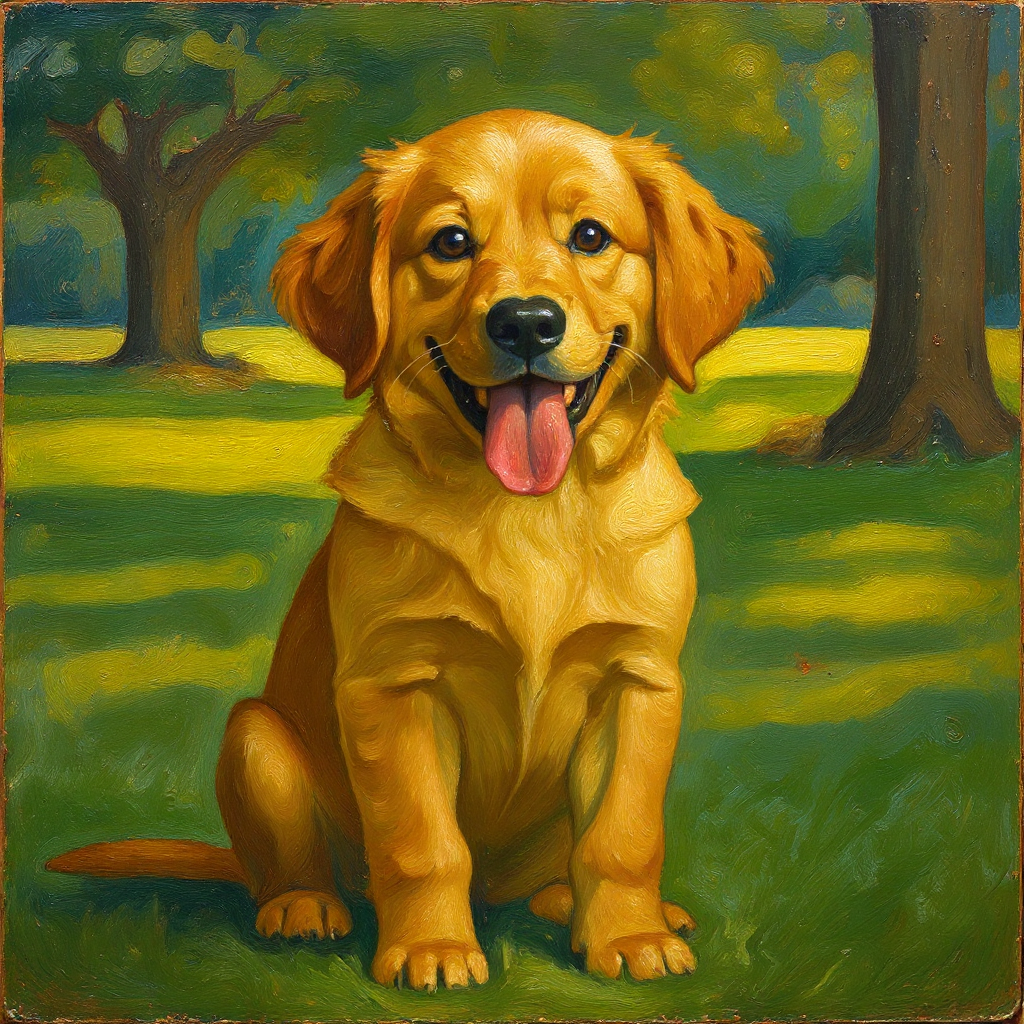
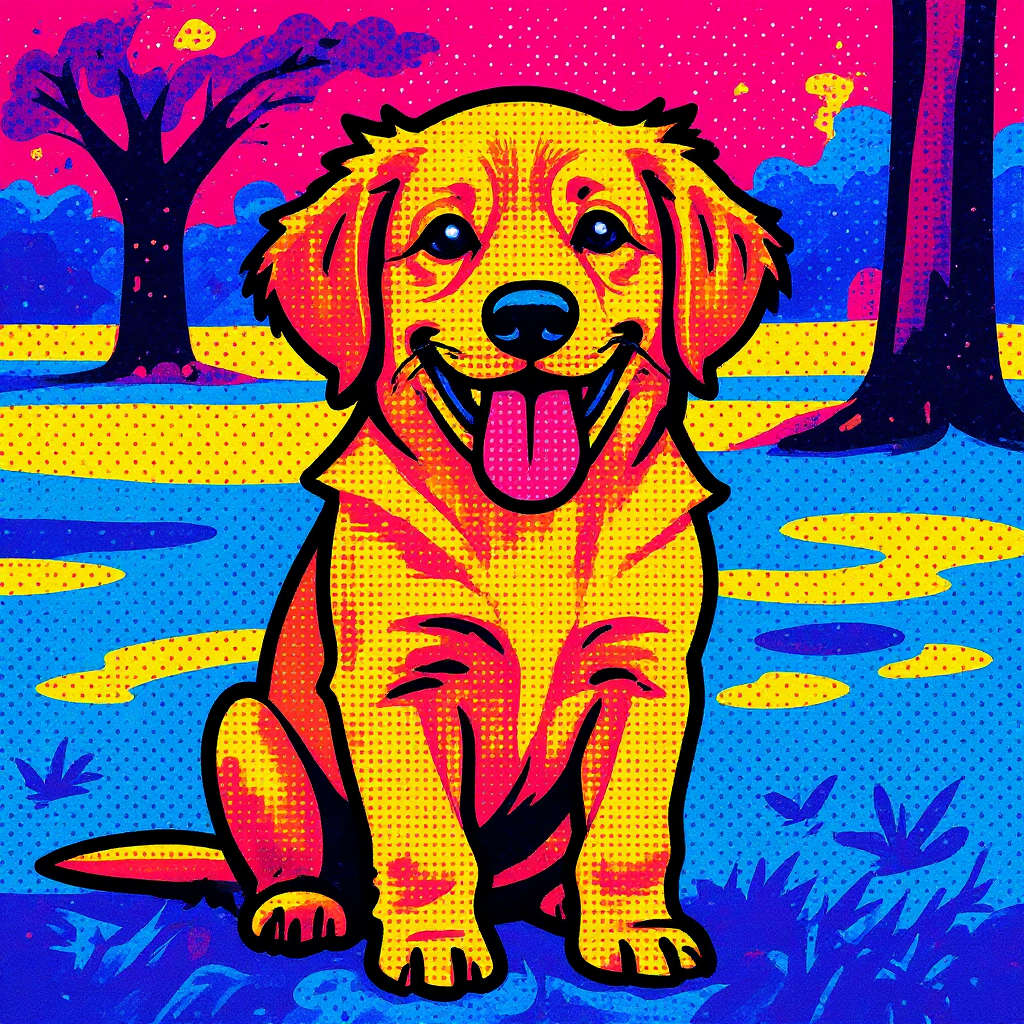
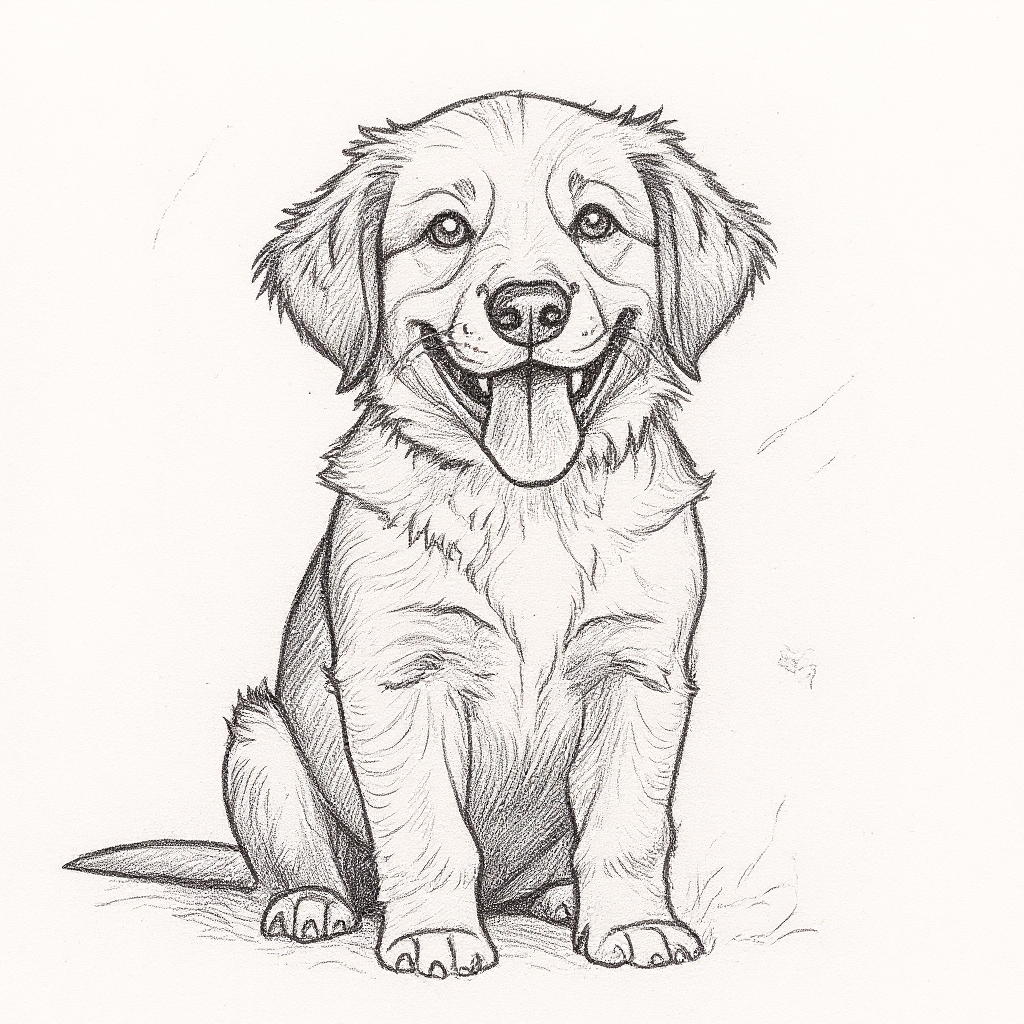
Here is the AI restyle in action - a shopper's photo transformed while keeping the same subject:
Uploaded photo
Oil Painting
Pop Art
Pencil Sketch
Generated with CPrint-ai's own AI tools. The input photo is an AI-generated sample standing in for a shopper's upload.
5. AI & image features
AI Restyle Advanced / Pro
Turns the buyer's photo into an art style while keeping the subject recognizable. Eight styles are available:
Style
Look
Oil Painting
Classical oil with textured brushstrokes and rich impasto
Watercolor
Soft translucent washes with gentle bleeding edges
Black & White
High-contrast fine-art monochrome with subtle grain
Retro / Vintage
1970s film print with warm, faded, nostalgic tones
Pop Art
Bold Warhol-style flat color blocks and screen-print outlines
Anime
Clean cel-shaded anime illustration with crisp linework
Futuristic
Sleek sci-fi look with cool tones and neon edge-lighting
Pencil Sketch
Detailed graphite sketch with fine cross-hatching
Background removal All plans
One tap cleanly cuts the subject out of its background - great for clean product placement or layering onto your mockup.
BeforeAfter (transparent background)
Text & fonts All plans
Buyers type custom text into the text layers you set up, choosing from the fonts and colors you allow. Adding and editing text is instant and unmetered.
What counts as an "image generation"AI restyle and background removal each use one image generation (metered against your plan). Adding text is free and does not count toward your limit.
6. Orders & print-ready files
When a customized order is placed, CPrint-ai automatically renders a print-ready 300-DPI PNG for every personalized side, bundles them into a ZIP, and attaches it to the order (usually within about 5-10 seconds). The output resolution follows the template's Print size - longest edge (inches).
TipOnly layers with Include for print ticked are baked into the print file, so marketing-only overlays stay off the final product.
Show the design in the order confirmation email
Shopify does not let apps edit your email templates automatically, so CPrint-ai gives you a small snippet to paste once. Buyers (and you) then see each side's design right in the order confirmation email.
Copy the snippet
On the app Home page, expand "Show buyers their design in the order email" and click Copy snippet.
Open notification settings
Go to Settings - Notifications - Order confirmation in your Shopify admin (there is a direct link next to the snippet).
Paste and save
Paste the snippet after the order / line-items section, then Save.
The snippet (for reference):
{% for line in line_items %}
  {% assign previews = line.properties['_cprint-ai_sidePreviews'] %}
  {% if previews and previews != blank %}
    <p style="margin:12px 0 6px;font-weight:bold;">Your custom design - {{ line.title }}</p>
    {% assign urls = previews | split: '|' %}
    {% for u in urls %}
      <img src="{{ u }}" width="150" style="max-width:150px;border:1px solid #eee;border-radius:6px;margin:0 8px 8px 0;" alt="Custom design preview" />
    {% endfor %}
  {% endif %}
{% endfor %}
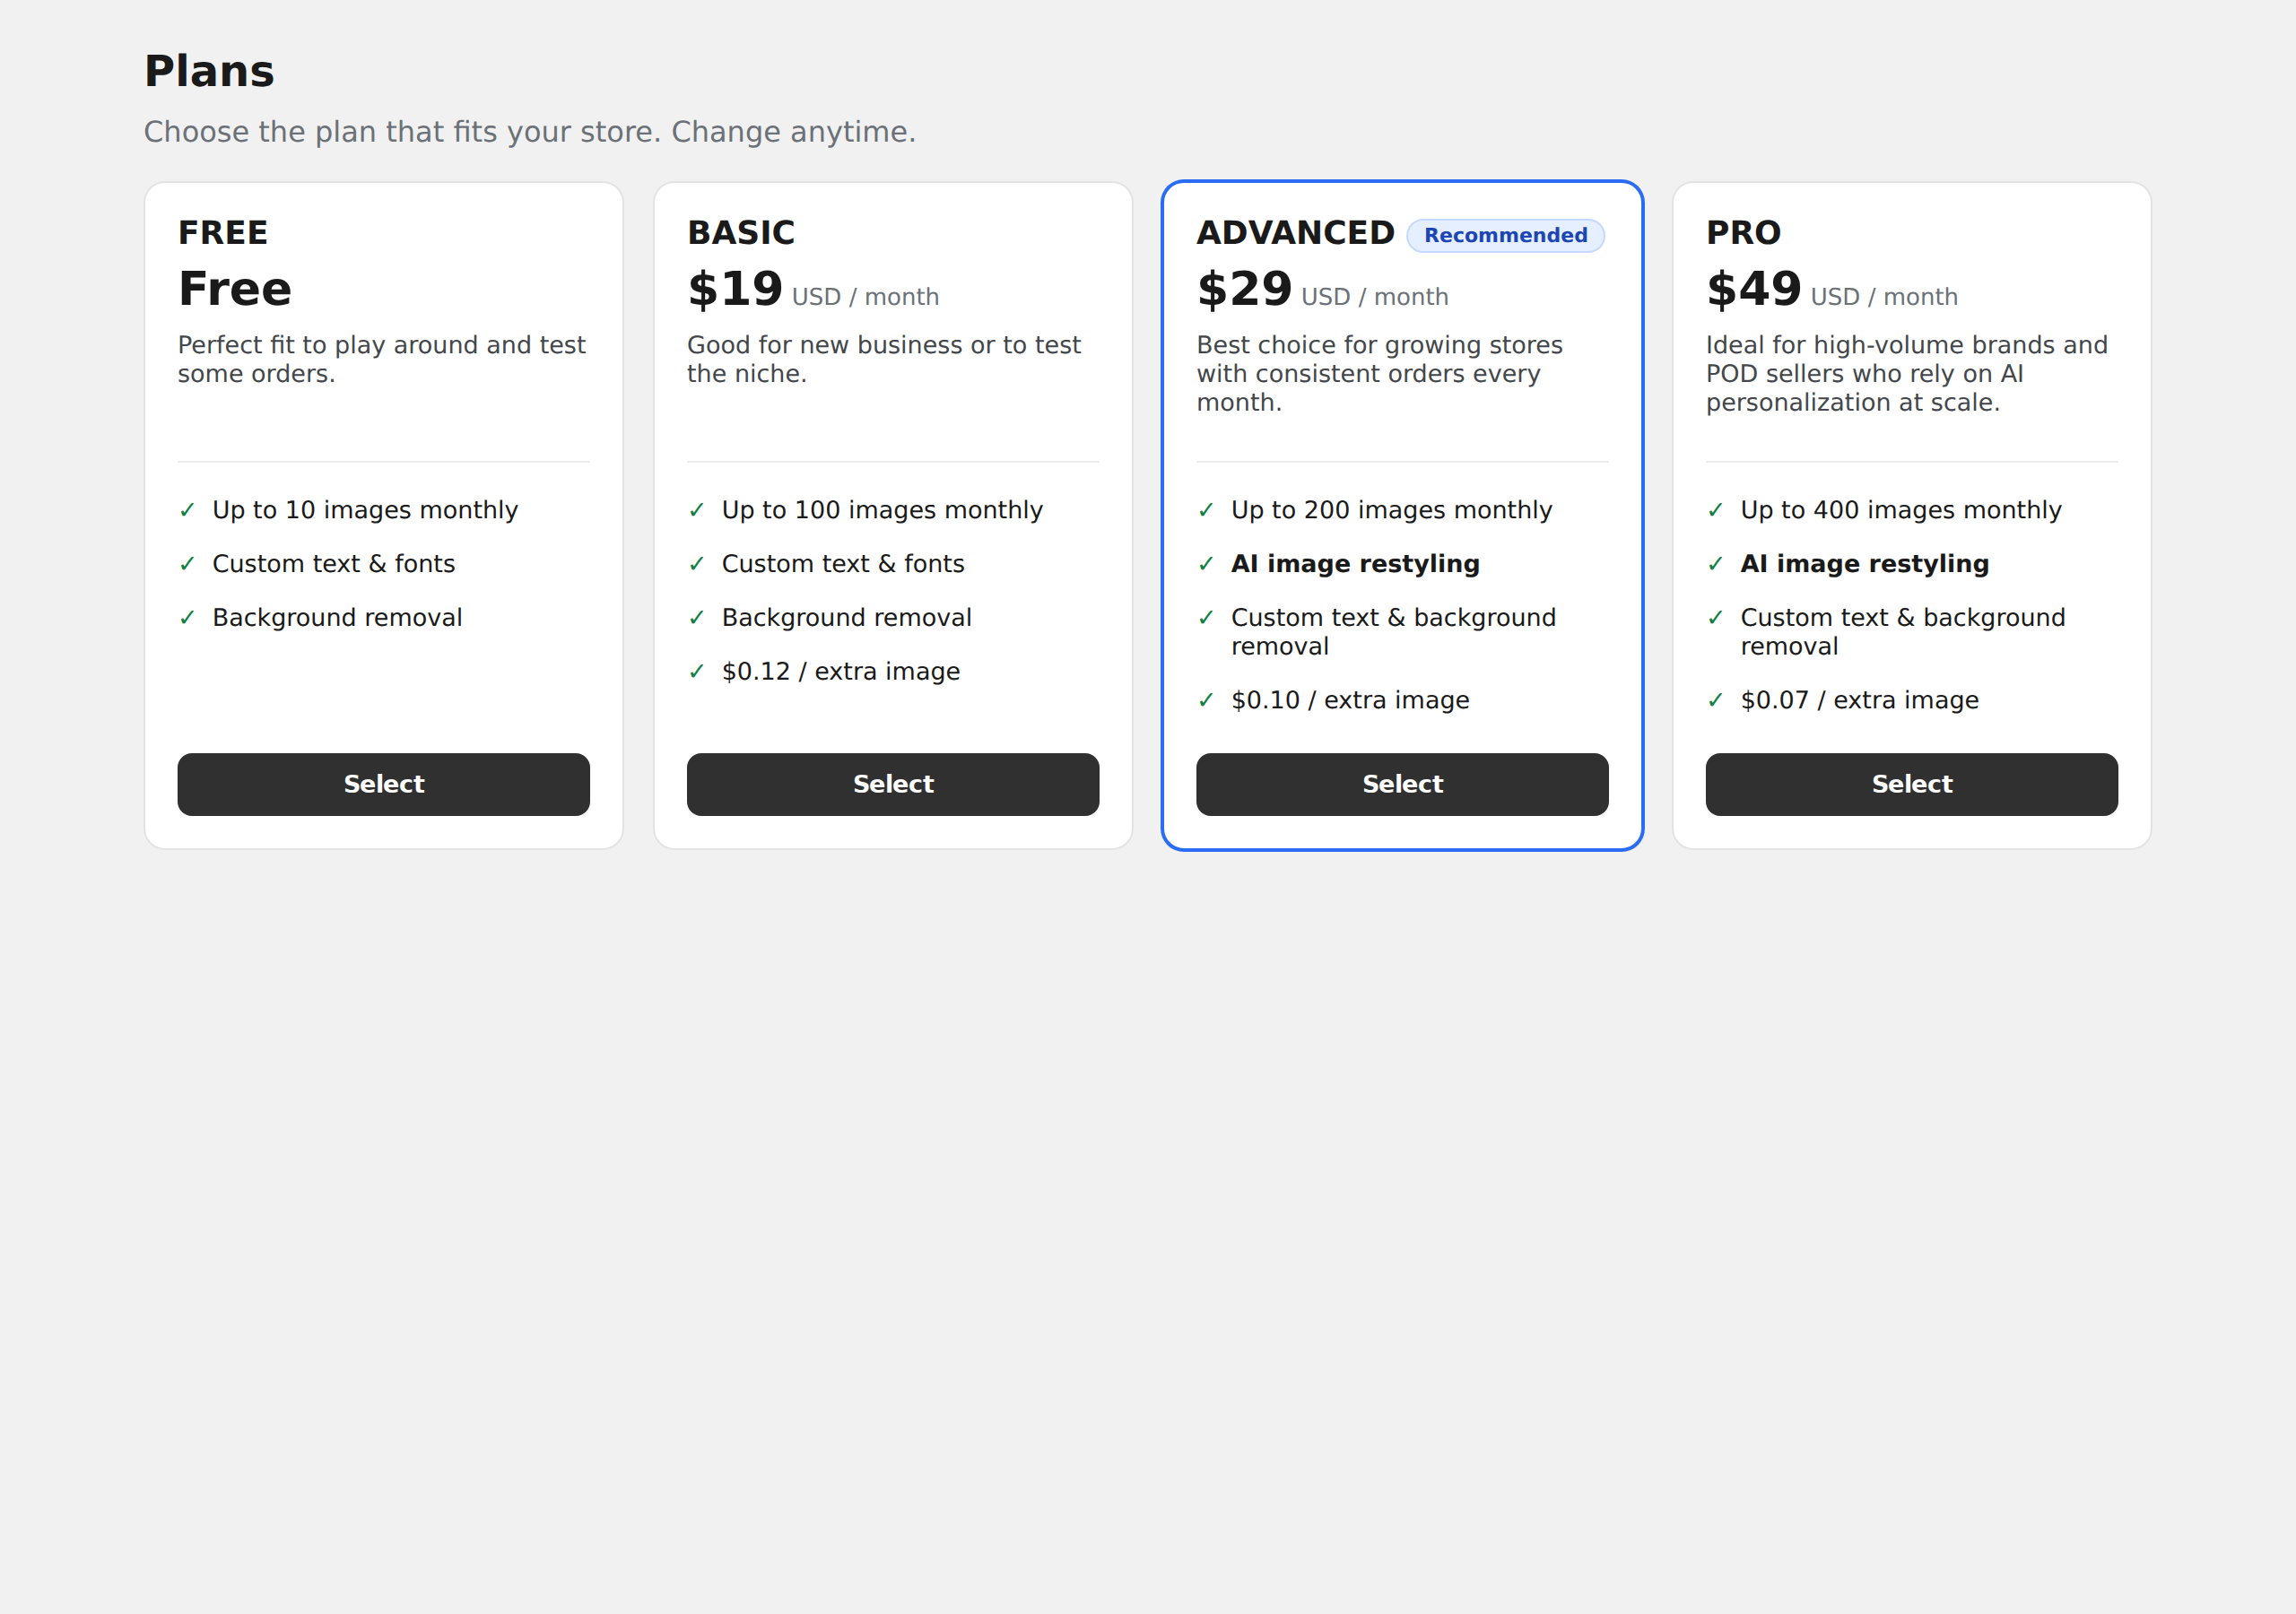
7. Plans, limits & billing
CPrint-ai has four plans. You can start on Free and change plans anytime from the Billing page; billing is handled securely through Shopify.
Plan
Price / month
Image generations
AI Restyle
Extra image
Free
$0
10 / month
-
-
Basic
$19
100 / month
-
$0.12
AdvancedRecommended
$29
200 / month
Yes
$0.10
Pro
$49
400 / month
Yes
$0.07
Custom text and background removal work on every plan, including Free.
AI Restyle requires Advanced or Pro.
An image generation is one AI restyle or background-removal operation. Adding text is free and does not count.
Going over your monthly allowance bills each extra image at your plan's rate (table above). Your usage and any overage estimate show on Home - Plan Usage.
The Billing page: Free, Basic, Advanced, and Pro. "AI image restyling" appears on Advanced and Pro only. These are the current plans and prices.
Track usageThe Home page shows "Images generated: X / limit" for the current billing cycle, and flags any extra images over your plan with an estimated overage cost.
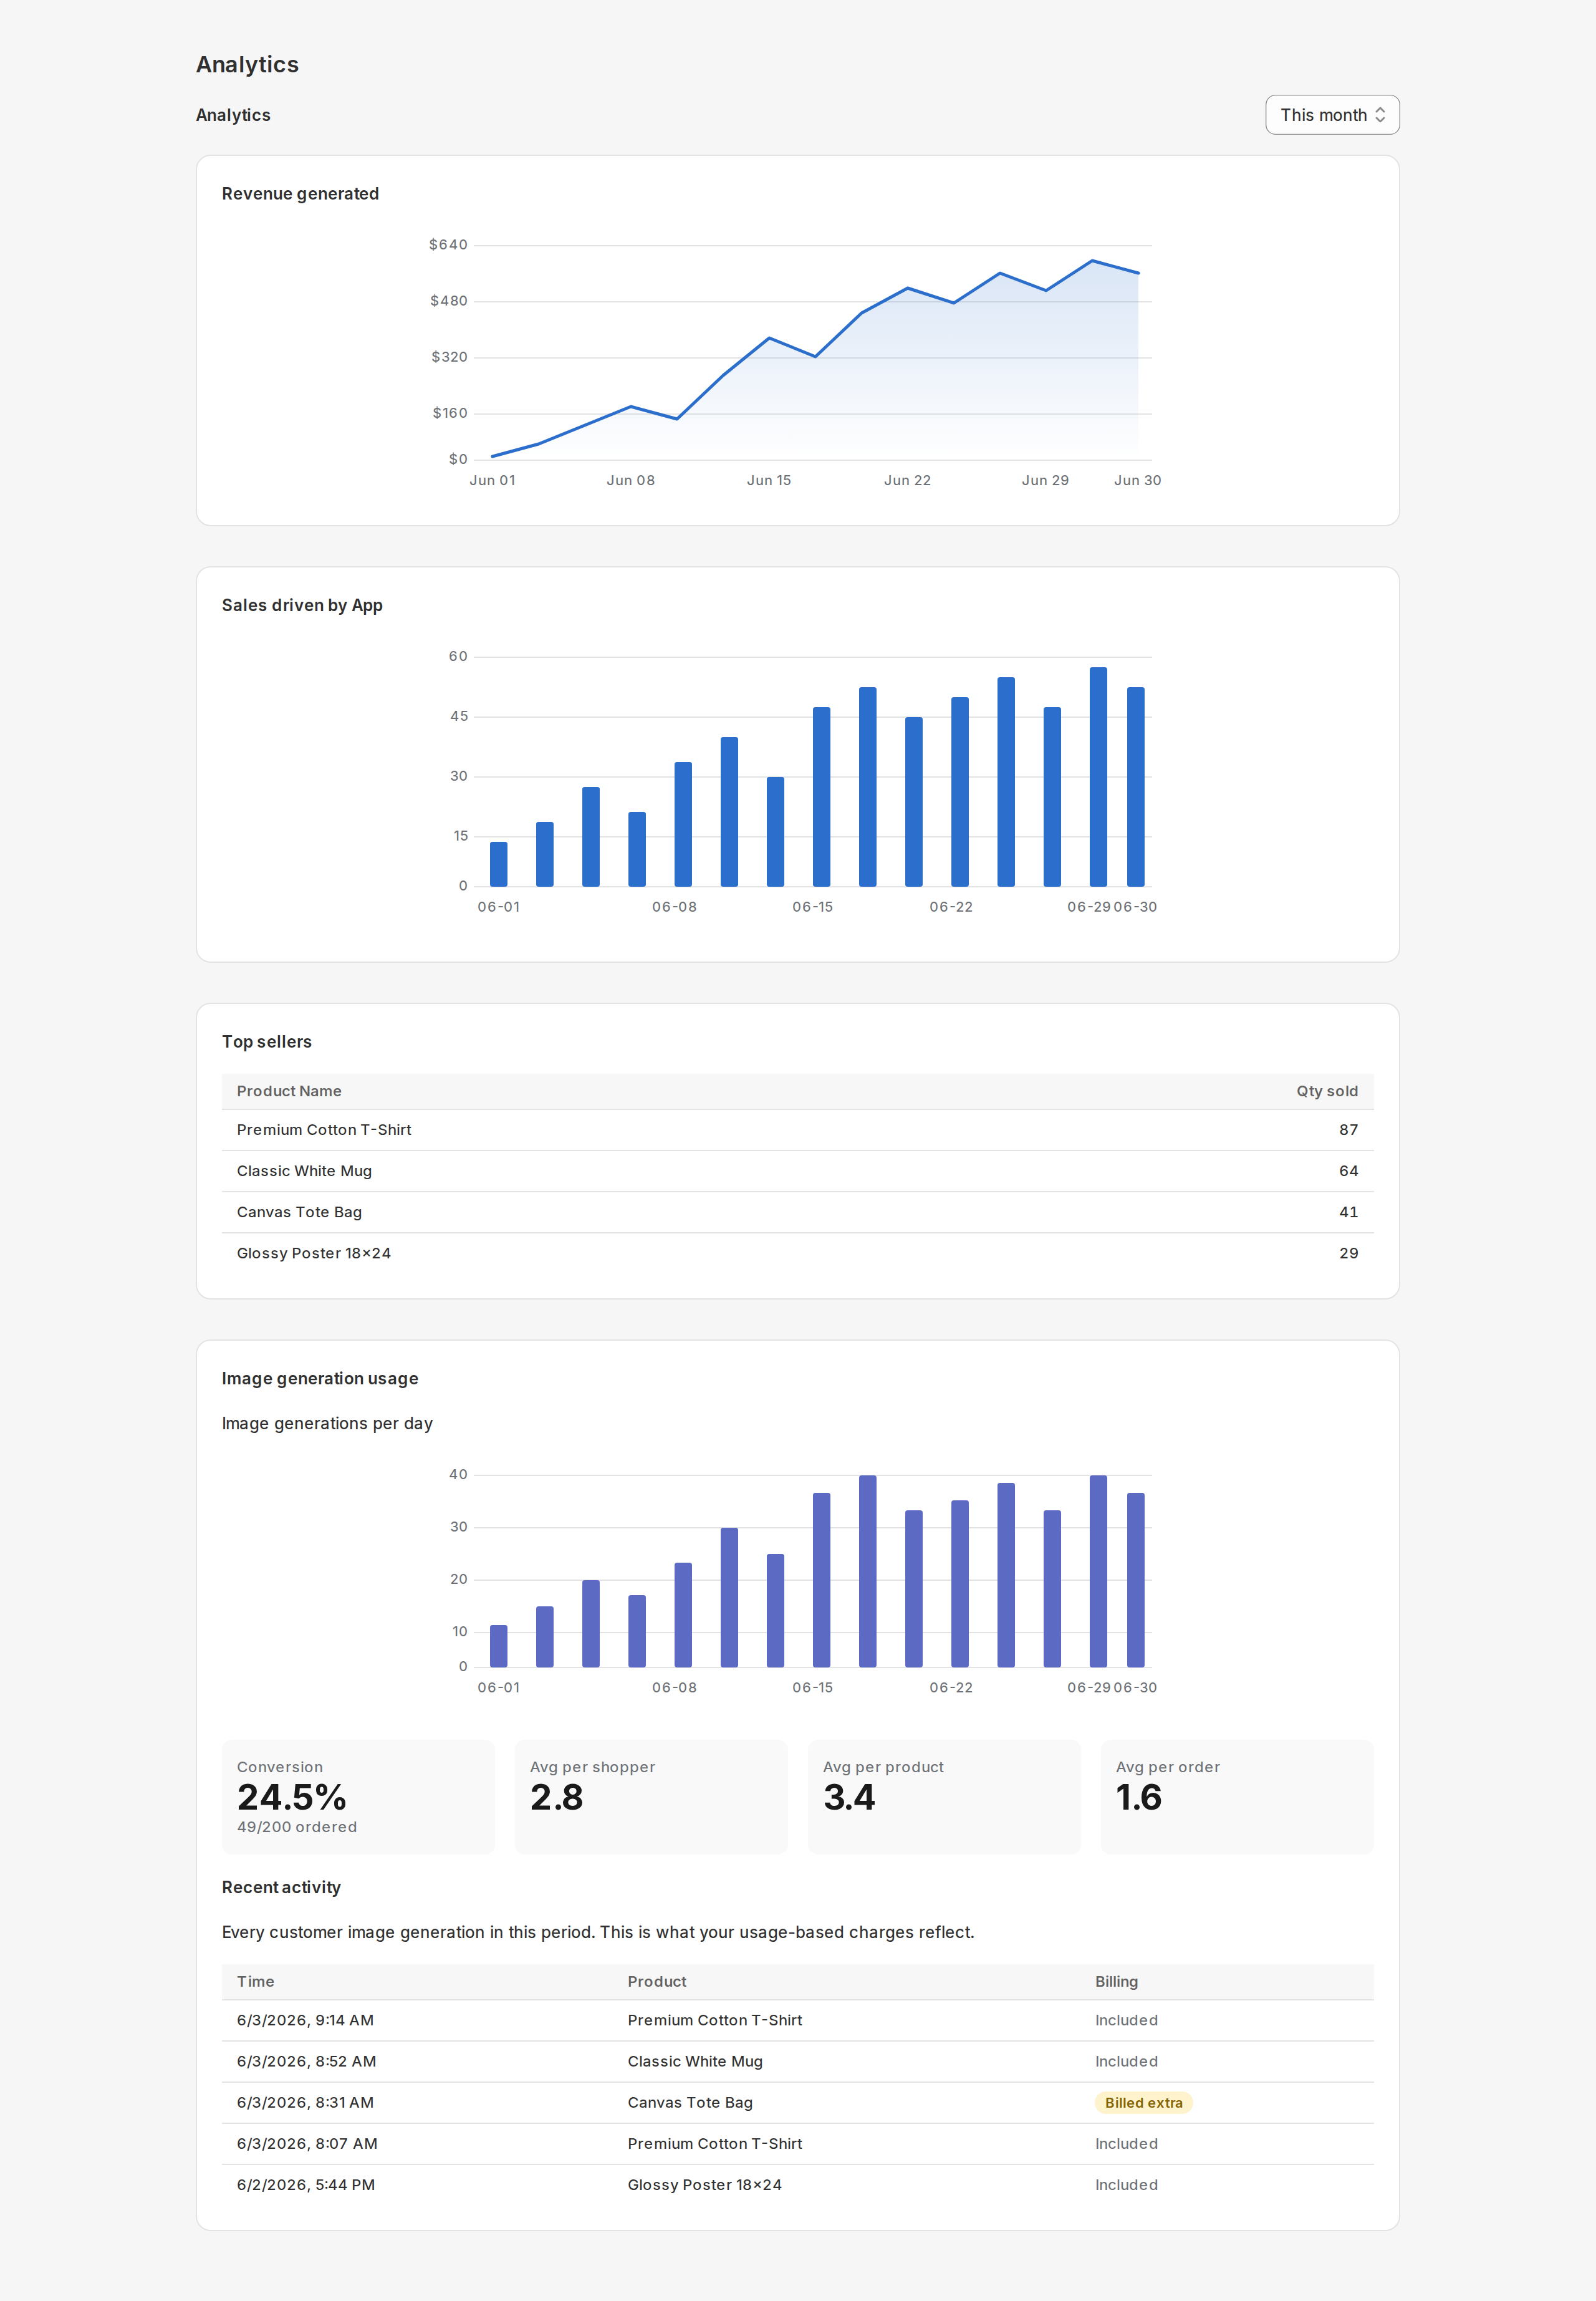
8. Analytics
The Analytics page shows how personalization is performing for your store:
Revenue generated by customized orders, over the period you choose.
Image generations per day, and the generation-to-order conversion rate.
Averages per shopper, per product, and per order.
Recent activity - a log of generations, with whether each was included in your plan or billed as an extra.
The Analytics dashboard. Representative rendering of the admin UI; your figures will differ.
9. Reliability & troubleshooting
Built-in safety netIf an AI service is briefly unavailable or your credits run out, CPrint-ai automatically hides the customization flow across your store so shoppers never hit a broken experience. It restores itself automatically when service recovers.
Symptom
What to check
The customizer does not appear on a product
Confirm the "Custom Print Template" app section is added to that product's template in the theme editor (Quick start, step 2), and that you have created a template for the product (step 3).
AI Restyle is greyed out for buyers
AI Restyle requires the Advanced or Pro plan. Upgrade on the Billing page. (Text and background removal work on Free.)
A buyer sees a low-resolution warning
Their photo is small relative to the template's print size. They can upload a larger image, or you can lower the print size for that product.
The print file or email preview is missing
The print file renders a few seconds after the order. For the email preview, make sure the snippet is pasted into the Order confirmation notification (Section 6).
Still stuck? Use Contact Support inside the app.
10. Glossary & quick reference
Term
Meaning
Template
The configuration that makes one product customizable (its sides and layers).
Side
A printable face of the product: Front (required), Back, Left, Right.
Layer
A zone on a side that the buyer fills in - an Image layer or a Text layer.
Include for print
Per-layer switch that decides whether the layer is baked into the print-ready file.
Print size (longest edge)
The inches value that sets the resolution of the generated 300-DPI print file.
Image generation
One AI restyle or background-removal operation - what counts against your monthly plan allowance.
App section
The "Custom Print Template" block you add to a product page to show the customizer.
Where things live
To do this
Go to
Activate the editor, see usage & the email snippet
App Home (General)
Create / edit customizable products
App Settings
See revenue, generations, conversion
App Analytics
Change plan
App Billing
Add the customizer to a product page
Shopify theme editor - add the "Custom Print Template" section
Show the design in emails
Shopify Settings - Notifications - Order confirmation